Showing posts with label modeling. Show all posts

Wednesday, January 8, 2014

There's no sense wasting time.


While we were waiting for the licenses, there's no reason we couldn't do a little work. Buying a piece of software is easy. Buying enough for an art department requires a contract, and support, and maintenance fees... and the world shuts down during the holiday season. So, we got our artists demo versions of the programs we're using, to do some training back in December.

We will be using Maya and 3DStudio, but most of our work is going to be done using Houdini, by SideFX. Houdini's mostly known for their movie work. They were part of the solution for Pacific Rim, The Wolverine, and Man of Steel, but they're also aggressively marketing themselves towards the video game industry. Assassin's Creed: Black Flag, for example, used them in the toolchain.

Serious tools for serious work.

One of our artists, AngelWolf, has been keeping a log of his adventures with Houdini. I thought we'd share some of it with you.

- Warcabbit

----------

Hi, everyone. I'm AngelWolf and I've been working on rigging a model for the Avatar Builder. While we were waiting for many of our purchases to go through over the hectic holidays, I began playing with the free Apprentice version of Houdini, a powerful 3D production suite that we will be using to do a lot of the work that the game needs. The process begins with an orthographic drawing of a character:


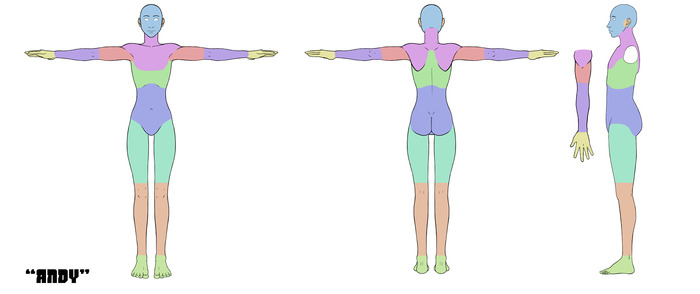
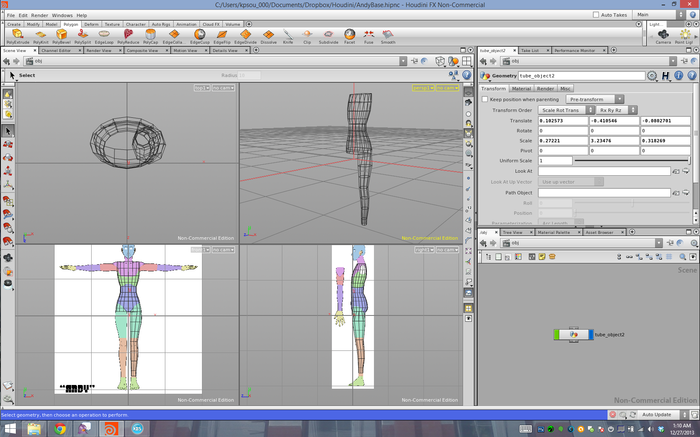
This is Andy, one of the templates our 2D team uses to draw different costumes. As you can see, the drawing is of a front, back, side, and top view of the character. What I do is cut the image down into smaller pieces and set them up as reference images in the software. I then use a technique known as box modeling to fit 3D geometry into the shape of the reference image, and poof, we have a 3D model:


But a model by itself is just a statue. In order to make it move naturally, it needs a skeleton, similar to this one:


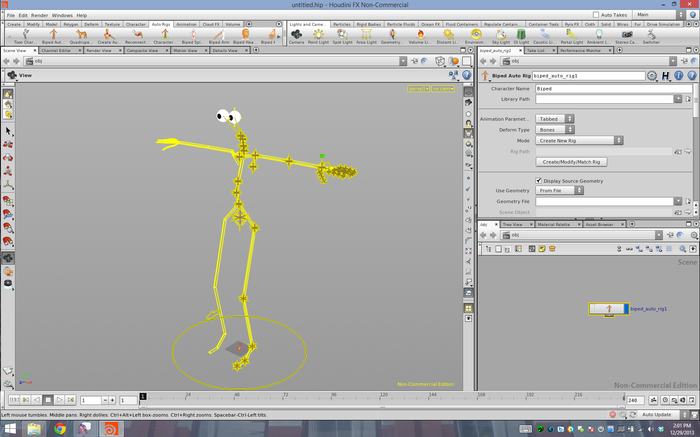
This is called a rig and to make it work, you need to match up the various joints inside the body of the character:


With everything in place, you can then create proxy geometry, which breaks the model up into smaller pieces so it's easier to animate. Here, I use cutting rings to surround the various parts of the body:


And the result is a bunch of color coded geometry with gaps in between, making it very easy to animate:


At this point, we are nearly there. With the push of a button, Houdini takes the skeleton and the mesh, and combines them into two more things:

1: An animation rig, which allows an animator to move the character by moving the bones around.
2: A deform rig which controls how much of the model moves with each bone. Both are pretty complex so I will cover them both in future updates.
Goodbye for now.

Ayooooah!

----------

Now, Angelwolf isn't the only person working on this. We've got all kinds of projects going on. Here's a little preview of the next subject we're going to try to cover.


It's a start. These things have learning curves. Steep ones. But once we master them, oh, the places we'll go.

This sword was made by DeathSheep... on pretty much a whim, as he got home from work one day.

I asked him about what he had to do to make it, and he said, "Probably half of the time spent on that -- from roughly 6pm to about 8:30 or so -- was simply figuring out the right set of places to access several of the tools. Tool learning curve. That sword, while not ideal, would probably be entirely sufficient for the game with one fix (There's a weird normal for one surface, it keeps trying to invert itself.) and then arranging the textures for the hilt and guard. The blade, as you can see, is already shiny metal."

"The technique I probably should have used would have had the benefit of letting you define a 'spine' curve for the blade and go anywhere from flat to scimitar to kris, although to really do kris would probably require adjusting the logic to be able to build a dual-edged blade."

"But is a little more advanced, and I knew I could knock this one out with just the utterly, utterly basic geometry fusing. And 15-20 minutes of "sitting and thinking" time to figure out the geometry."

That's when I challenged him to make a teddy bear with between two and sixty four legs.

He actually took it seriously.

"Bah. More trouble than it would be worth, it is a squoodgy shape which means metaballs which means having to muck about with the kernel and density functions to get it to behave reasonably when they're packed that tightly."

I gotta tell you folks, I love working with everyone on this project. They're all completely insane, but in a very productive way.

Coming soon... The Big Game... and the Survey.

Thursday, October 10, 2013

Thank You! (#3)

Steve "Minotaur" Dannell, forum mod and prospective QA person

I'm just amazed at the amount of money that has come in and the speed it arrived. Seeing a load of people I played CoH with, some of the old Paragon people and some people who I know never played the game among the list of donors is wonderful. Hoping for a long trip up the stretch goal mountain too as there are lots of exciting things to be found there.

Now the real work starts, we will have the tools we need and need to create a world that will excite and make sure people feel their money has been well spent. If we can create a framework for a wonderful community as CoH did, only then will I truly feel we have accomplished our goal.

Thank you so much for your support
----------

Jack "Olantern" Snyder, Staff Writer

I'm ... awed? Overjoyed? Astonished? Delighted? Well, I'm definitely at a loss for words!

Thank you, from the uttermost depths of my heart. Your outpouring of support over the past week has humbled me, inspired me, and thrilled me. I arrived home less than a week ago Tuesday night, exhausted from a disappointing week of work on my day job, to discover the Kickstarter alive and numbers rapidly climbing. It was like a breath of oxygen on a high mountaintop. With my fellow Staff writers, I watched the first several hours obsessively, like an excited family huddled around a tiny TV screen watching a premiere in the old days.

Exciting as that was, it was nowhere near as thrilling as seeing us reach our goal today. Much as writing for the project is a labor of love to me, it's wonderful to see someone else have faith in it, too. A prominent literary agent once said that within every writer is an artist, who writes for the pure joy of creation, and an entertainer, who writes to feel the adulation of being read and appreciated. It's a profoundly warming feeling to have my inner entertainer validated a little!

But reaching this milestone isn't really about me. It's about you, the City of Titans community. Your enthusiasm, loyalty, and faith made this moment possible. We will do everything we can in the coming weeks, months, and years to fulfill the trust you've placed in us.

Excelsior!

-Olantern

----------

Ryan 'KelpPlankton' Gioia, 3D Artist and Animator.

This is really crazy how fast everyone's come together to support us. I'd particularly like to extend a thanks to the former City of Heroes developers who've not only supported us via the Kickstarter, but also helped get the word out about City of Titans. A game like this is something I've always wanted to see get made, and the opportunity to be part of helping it come together is something I'd never pass up, so it's nice to see so many other people feel the same way! I'm just as excited to play the game as anyone else.

Now I just need to figure out how to blackmail the team into having water powers ready by launch...

----------

Christopher "Roadkill" Denny - Foley Artist/Audio Engineer

Wow! Wow wow wow wow wow WOW!!!! What's that again? 5...6 days and we reached our goal?!
What a community!!!
Hang on a second

*Wipes one manly tear from face*
You guys are the absolute best!!! You guys also deserve the very best, and that's what I aim to provide for you guys! At the beginning of the kickstarter I was scared "what if we don't reach our goal?" Well, ladies and gentlemen, you've done it! Now I know the next part isn't so fun for you guys - Waiting - Waiting for the game to arrive, waiting for your financial efforts to pay off, but it will SO be worth it! Thank you all, from the very bottom of my heart for everything!!!

It wasn't that long ago I was reading up on gaming news and came across an article describing the goals of the Phoenix Project and made the decision to join the team, now here we are - I'm rambling...Seriously, all, I'm in awe here, I can not thank you enough!

Thank you thank you thank you thank you thank you!!!
----------
Michele "Quantumhero" Alexander-Sichelle - Marketing Researcher

THANK YOU.

This project is a labor of love, blood, sweat, and tears for all of us. We vowed to create a new home for a very special community and welcome all new members with open arms.

It will take time and a lot more effort to do this right...but thanks to you we can fulfill the parting words of Paragon studios and "fly free".

Welcome home.

Thursday, September 19, 2013

Pre-Update "Under The Hood" Blog Entry


MISSING WORLDS MEDIA
Pre-Update Blog: Thursday September 19, 2013

Contributing writers: DeathSheepfromBelow, Petalstorm, Robin, and VDG


Hey everyone, I know you’re all waiting on the edges of your seats for some KS info - and that’s coming Soon™. What I want to show you guys is a quick and dirty “under the hood” look at what we’re working on, using very specific example.

A week ago some of you may have seen an image teased on Facebook of a potential - and let me stress that - potential - City Hall model. Until we have final tools for asset creation, everything has gone, and will continue to go through, multiple iterations until a final look is settled on. This blog is about one of the City Hall concepts that was generated by our team of artists (2D and 3D) and tested in the Unreal engine.


Front view in Sketchup
Why go through the effort of making a mock-up of a concept and then importing it into the engine? Many reasons - one of the most important ones is to give an idea of scale and how it might look inside the engine from the perspective of the player. It can also influence some necessary changes that wouldn’t be apparent on just pen and paper or in a 3D modelling application.


After the initial concept sketch was done on pen and paper, the sketch was brought to life in Sketchup, a very popular architectural and 3D modelling tool.


Currently we are using Blender and Sketchup as our tools. Sketchup is an awesome tool for beginners and it great for architectural modeling - the video game Uncharted even made use of it (http://sketchupdate.blogspot.com/2011/02/art-and-design-of-uncharted-2.html.)


Sketchup Design
One of the concept models, as viewed in
Sketchup
Blender is a power open source 3D modelling tool that is capable of beautiful renders (I’m obsessed with their Cycles renderer,) cloth and fluid simulations, animation, video editing, sculpting, and so much more. However, it is has an extremely steep learning curve, unlike Sketchup.

So here comes the fun part: how to get this model from Sketchup to Unreal. As it so happens, much like image files, there’s no one universal file “type” for 3D models - there’s a considerable variety. Some save just the basics - the shape of the model and how everything is connected. Some file types save everything - from materials, to morphs, to animations, to particle effects. Sketchup happens to only export the most basic file type - simply known as OBJ. The Unreal Engine, however, only accepts model types with the FBX extension, which is currently a proprietary format for the Autodesk suite of tools (like Maya.)


So, how do we get from Sketchup to Unreal? Well, we have to use a program that sort of acts like a “converter” - that’s where Blender comes in. Blender can fortunately export to the FBX file format, although it is not perfect and can be a bit buggy. So we import the OBJ file into Blender, do some quick checks to make sure everything is still connected, and then export to the FBX format with the correct options selected.

And this is what imports into the Unreal engine:

View of the original mesh in Unreal
The model imported into the Unreal Editor.
Not what we modeled. Not at all.

Second view in UDK
Doesn't look better on this angle either.


To summarize, this took some time to fix, and it took some good people. There are some very complicated parts as to what occurred here and why this building could function as Grade A Architectural Nightmare Fuel, but I’ll cover the most basic thing that went wrong in the process.

3D models are comprised of vertices, edges, and faces. The vertices are essentially points plotted on X, Y, Z coordinates. Edges define how vertices are connected to each other. Faces define the “area” that fill an area between vertices and edges and will ultimately display the texture applied to the model. Every face has what is called a “normal” which defines the direction the face is pointing.

Inside/Outside view in UDK
A view of the model from the outside and inside
In Blender and Sketchup you can see a face from both sides since both of those programs consider a face to have two sides. However, this can actually become a memory hog for your computer. In almost every single video game engine, a face is only considered to have one direction.  If you look at the side of the face that is in the opposite direction of the normal, what will happen is you’ll simply see right through the face as if it wasn’t there.

Why did this make our model look like a bonafide freak show in Unreal? Since normals don’t matter in Sketchup the program doesn’t bother to set them correctly. When we imported it into Blender it couldn’t tell where the inside or outside of the model was based on the data stored and imported from the OBJ file, and that carried through into the FBX file.

Normals correction
Before and after of fixing the direction of
the normals on a face.
What we had to do was manually correct each and every single aberrant face on the model in order to get it display correctly in Unreal.  This means making sure the normals are pointing outwards from the model, rather than inwards. This was an incredibly time-consuming task because this model has over fourteen thousand faces (that’s actually low for a 3D model.)

Periodically, we had to test-import the model as we fixed these normals. This helped us to find areas we may have missed due to some of the faces being incredibly small ( and due to the fact that, after staring at the same thing for hours on end, you tend to start missing things ).

And this, below, is our final result in Unreal.

View of final mesh in Unreal
View from the front

Second view of final mesh in UDK
Yes, this is what we had modeled.


This isn’t to knock Sketchup and Blender - they’re both incredible tools (and free!) but they have some serious limitations when it comes to using them with other programs (especially Unreal.)

As I mentioned earlier, FBX is a proprietary format, but it is also the preferred format for importing into Unreal. Right now Blender only speaks an outdated version of it, but more importantly, it simply doesn’t do nearly as well with game assets as the proprietary tools do. Thirteen hours using free tools, against roughly three hours using a trial version of the alternative. For a relatively simple, low-poly mesh building. Multiply that by somewhere between “several dozen” and “a few hundred”, for just the building exteriors. That doesn’t count the time spent on the learning curve.

Well that’s it for this blog. If you have any questions, comments, concerns, then join the discussion on our forums (http://www.cityoftitans.com)!